Shrinky Dink Ideas
The popularity of Shrinky Dink crafts is increasing! Yes, the plastic sheets you used as a child are becoming more and more common. And I’ve never been happier!
Sincerely, I enjoy using Shrinky Dinks. They may be used for a variety of recipes, and who doesn’t enjoy seeing them get smaller in the oven?
Shrinky Dinks are another one of those fantastic activities that produce fantastic results! It’s an entirely win-win circumstance! (Sort of like my painted rock cacti or nebula in a bottle!)
What exactly are Shrinky Dinks?
Shrinky Dink is a craft material brand that has been available since the 1970s. (It’s also known as Shrink Plastic.)
When heated, plastic shrinks to one-third its original size and nine times its thickness. You’re left with a little, firm piece of plastic that preserves the original shape (but is smaller) and any colors you’ve applied.
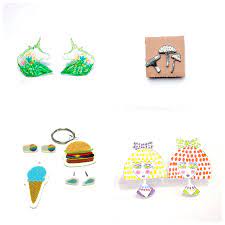
Although it is typically a children’s toy, many adults (including myself!) like playing with it. In fact, it’s a highly popular material for jewelry manufacturing! Such like these rings:
Shrink Plastic Sheets: How to Use Them
Shrinky Dinks are quite simple to use, and I’ll show you how to make your own masterpiece!
The fundamental steps are as follows:
- On the plastic sheet, draw or print a design.
- Design for cutting off
- Punch a hole (if producing a charm, keychain, or other item that requires a hole to be hung)
- Preheat the oven to 325°F for 2-4 minutes.
- Allow to cool before using.
- Enjoy!
Shrink Plastic Varieties
Shrink plastic sheets are classified into three types: clear, frosted, and white.
You can occasionally find nice patterned sheets, but they are a little tougher to come by (and frequently sold out).
The transparent and frosted sheets are ideal for any application where you need to trace a pattern or design. They also create beautiful charms and jewelry.
White plastic sheets are ideal for printed designs or when you need a solid background, such as for a keychain.
Pencils, pens, and printing
There are numerous methods for getting your design onto the plastic sheets, but you must use the proper materials.
- Markers
- Permanent Markers (we especially like the shiny Sharpie markers!)
- Colored pencils (not cheap ones)
- Acrylic Paint Printer (be careful to use Shrinky Dink printer paper)
Crayons, oil-based paints, and cheap colored pencils are all examples of oil-based products. In the oven, these will burn!
Whatever media you use, keep in mind that the color will get more intense as it is shrunk. A dark pink, for example, may appear red. Alternatively, dark blue may appear black.
Getting Rid of Shrinky Dinks
After you’ve finished your design, it’s time to cut it out. You can cut it out using normal scissors. If your design has a lot of detail, use little scissors to get into all the nooks and crannies!
You can even use a die-cutter machine (such as Cricut) to cut out a design (you should definitely cut it out before embellishing).
One thing to keep in mind is to make any necessary holes BEFORE baking. You can use a conventional paper hole punch for this (the hole will become smaller as it shrinks).
It will be impossible to make a hole in your cooked plastic. So, if you’re going to make a keychain, charm, necklace, or anything else that requires hanging, drill the hole before you bake!
Your design will be reduced to one-third its original size. The dimensions of the finished product are shown below.
Original Design Size: 1′′ Finished Design Size: 1/3′′ Original Design Size: 2′′ Finished Design Size: 1/3′′ Original Design Size: 3′′ 1′′ Finished Design Size Original Design Size: 4′′ Finished Design Size: 1-1/3′′ Original Design Size: 5′′ Original Design Size: 6′′ Finished Design Size: 1-2/3′′ 2′′ final design size
Shrinky Dinks in the Oven
I recommend using a toaster oven because it heats up faster and uses less electricity!
Line a cookie sheet with parchment paper or foil that is oven-safe. Place your cut-out design on the cookie sheet and carefully place it in the oven.
Check the box of your Shrinky Dink plastic for specific directions, although they normally take 2-4 minutes at 325°F.
When your product is in the oven, you must pay constant attention to it since it bakes quickly.
The plastic will roll up somewhat and then flatten out as it heats up. It’s done when it’s entirely flattened out!
While the Shrinky Dink cools, I sometimes set something heavy on top of it to make it exactly flat.